Move an element to center of image
In this new opencv example, you would like to move a specific element of an image to another place, and to make this easy, let’s say at the center.
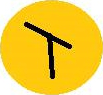
The source image to be used, and the code are inspired from the following stack overflow question: Move area of an image to the center using OpenCV
This uses a few core opencv concepts, about contours finding, submat, and masks, and makes entirely sense once it is running.
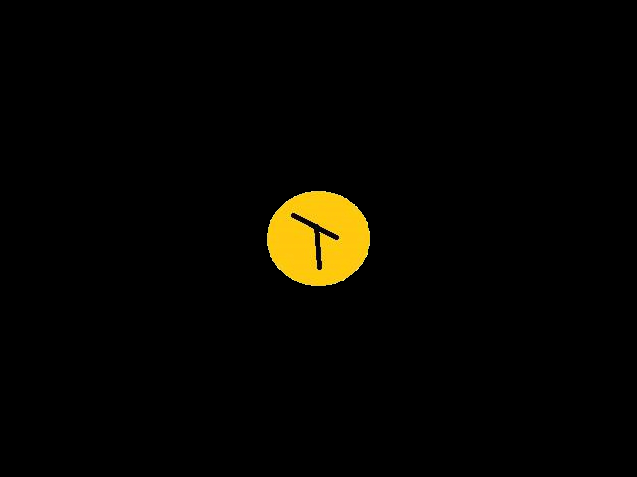
You would like to move that yellow part of the above image to the center. To make sure only the yellow part will be moved and not the underlying box, we will also change the color of the output image to black.
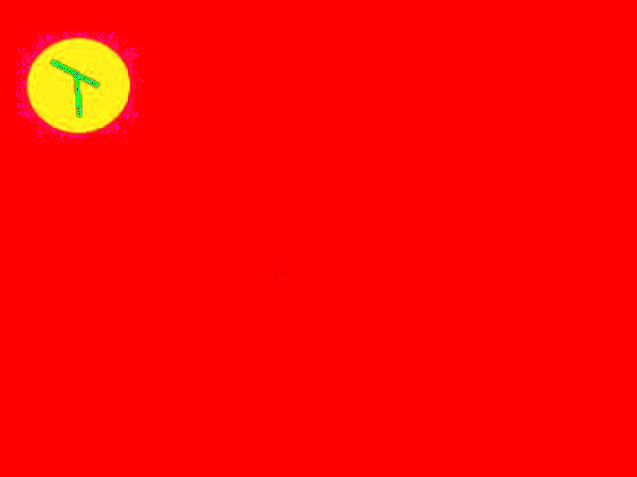
If you have been using OpenCV just a bit, you would know that first we move to a different color space, from the usual RGB to HSV, in where it is easier to select a range of color, (a hue), without being impaired by lightness and contrast.
(def img (imread "resources/morph/cjy6M.jpg"))
(def hsv (new-mat))
(cvt-color img hsv COLOR_BGR2HSV)
This gives the following colored image:
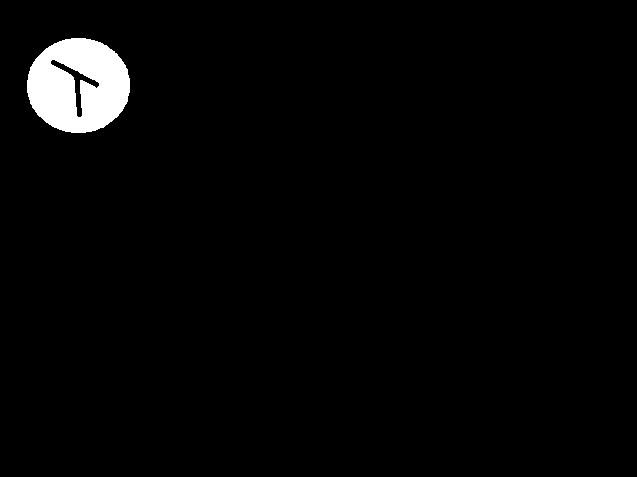
We would like to focus on the yellow part, so we will check the color range for yellow, and create a yellow-mask from that range. Here 20-40 is the range of values for hue corresponding to yellow.
(def mask-on-yellow (new-mat))
(in-range hsv (new-scalar 20 100 100) (new-scalar 40 255 255) mask-on-yellow)
Now the yellow shape is easily findable in the above, we can use OpenCV find-contours method. RETR_EXTERNAL is used to avoid finding more contours within our yellow shape, and only focus on the outer shape. We do not want all the points of the contours, only the most important ones, that is why CHAIN_APPROX_SIMPLE is used. (If you need all the points, you can pass CHAIN_APPROX_NONE as a parameter to the find-contours function).
(def contours (new-arraylist))
(find-contours mask-on-yellow contours (new-mat)
    RETR_EXTERNAL CHAIN_APPROX_SIMPLE)
All the contours are now in the contours list, and if you check, you would actually see that there is only one contour in this one:
(count contours)
; 1
Great, we have this one coutour, and we would like to create a mask from it. CV_8UC1 helps define a Mat with one 8-bit unsigned channel per element of the mat, and the base color is black, (new-scalar 0 0 0).
(def background-color (new-scalar 0 0 0))
(def mask (new-mat (.rows img) (.cols img) CV_8UC1 background-color))
The mask Mat being ready to receive values, let’s draw the contours on it using draw-contours. 0 stands for contour id ; there is only one contour as we have seen, and the start id is 0. The color to draw is 255.0, as we have only one channel to draw onto, and the pixels inside the contour-ed shape will be FILLED.
(draw-contours mask contours 0 (new-scalar 255.0) FILLED)
This gives the resulting mask as below:

We are back to the original goal of moving the yellow shape to the center. Let’s use the bounding box of the shape to be moved and create a small mat from it named item.
(def box (bounding-rect (first contours)))
(def item (.submat img box))
Actually, we do not want to move the bounding box, but only the shape, so we will create a new item by copying the yellow item through a mask, where 1 values tells the copy to keep the pixel from the original, and 0 means do not copy anything. The base color for this new item will be the color of the final image, so black.
(def segmented-item
  (new-mat (.rows item) (.cols item) CV_8UC3 background-color))
(.copyTo item segmented-item (.submat mask box) )

Now let’s find the center of the original image and create a centered box, with size of our created item ; as you remember box is the bounding box of the item.
(def center
  (new-point (/ (.cols img ) 2 ) (/ (.rows img) 2)))
(def center-box
  (new-rect
    (- (.-x center ) (/ (.-width box) 2))
    (- (.-y center ) (/ (.-height box) 2))
    (.-width box)
    (.-height box)))
We are ready for the copy. Let’s create the resulting mat with a black background color.
(def result (new-mat (.rows img) (.cols img) CV_8UC3 background-color))
We select the submat of the result mat, with the rectangle computed at the center.
(def target-mat (.submat result center-box))
Finally, we make a copy to the target-mat, the portion of the final mat that is at the center. The (new-mat) parameter means this time we do not use a mask when copying, and just copy everything.
(.copyTo segmented-item target-mat (new-mat))
And here you go, the yellow item is centered, on a newly created mat with a different background.